
Real-Time Inference with ML.NET and Azure Stream Analytics
In this post I will explain how we can set up a real-time data streaming pipeline to achieve real-time inference with ML.NET using Azure Stream Analytics and C# user-defined functions (UDF).
Integrating ML.NET with Azure Stream Analytics is something I’ve been wanting to do for almost a year, and it’s kind of funny story how all of this came about. I’d previously worked extensively with Azure Stream Analytics and ML.NET separately, but never together. When the conference ProgNET’s CFP went live in the spring of 2019, I thought to myself, why not submit a half-day workshop on how to build a model from scratch and deploying it to a real-time data pipeline in Azure. Little did I know that what I was envisioning was not yet possible, and something I probably should have confirmed before getting accepted to speak. Fortunately for me I was able to work around it using Azure Functions for my workshop, but today I’m thrilled to see that Azure Stream Analytics finally offers native support for ML.NET.
Real-time Inference in Azure
Real-time inference in Azure Stream Analytics is nothing new, and it has been possible to do for a while. The most common approach has been to directly call a web service hosted by the classic Azure Machine Learning Studio from the continuous query. There are a number of limitations with this approach and to just mention one, you’re forced to train and host your model in Azure ML Studio which does not offer support for open-source libraries such as Tensorflow. To counter that, the Azure Stream Analytics team recently released support for the new Azure Machine Learning service. This in itself is a great leap forward, but as Azure Machine Learning still doesn’t support C# and ML.NET, it does not meet the needs of the .NET community.
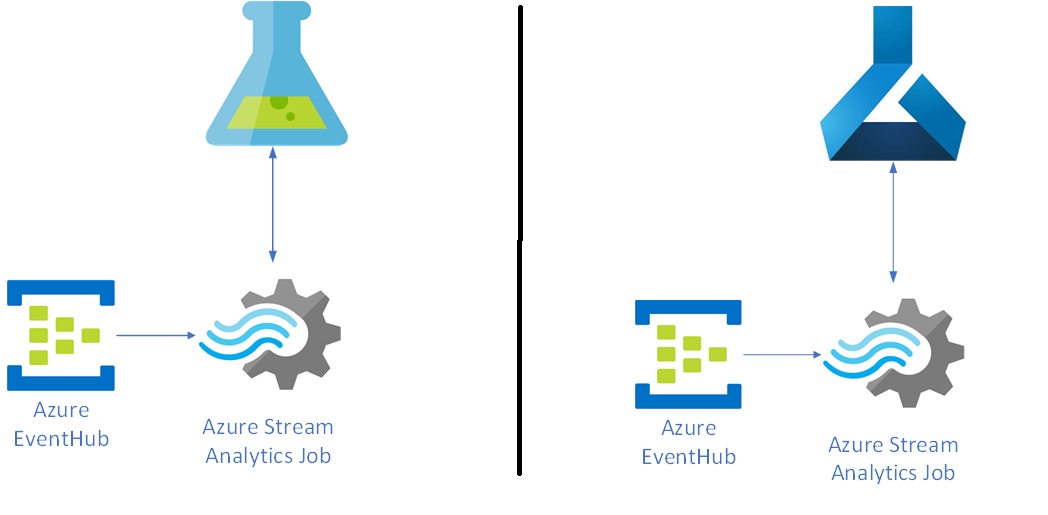
As you may know, ML.NET is an open-source, cross-platform library for machine learning in .NET. To be able to integrate an ML.NET model with Azure Stream Analytics, we need the ability to call it through a C# user-defined function. Azure Stream Analytics Edge (run on IoT devices) have had the possibility to create C# UDF’s for a while, but it’s not until this fall this support has arrived to its cloud sibling.
Let’s see how we can get started.
Prerequisites
To get started make sure you have the following installed:
- Visual Studio 2019
- The “Azure Data Lake and Stream Analytics Tool” Visual Studio extension
- .NET Core SDK v3.1
Setting up an Azure Stream Analytics Project
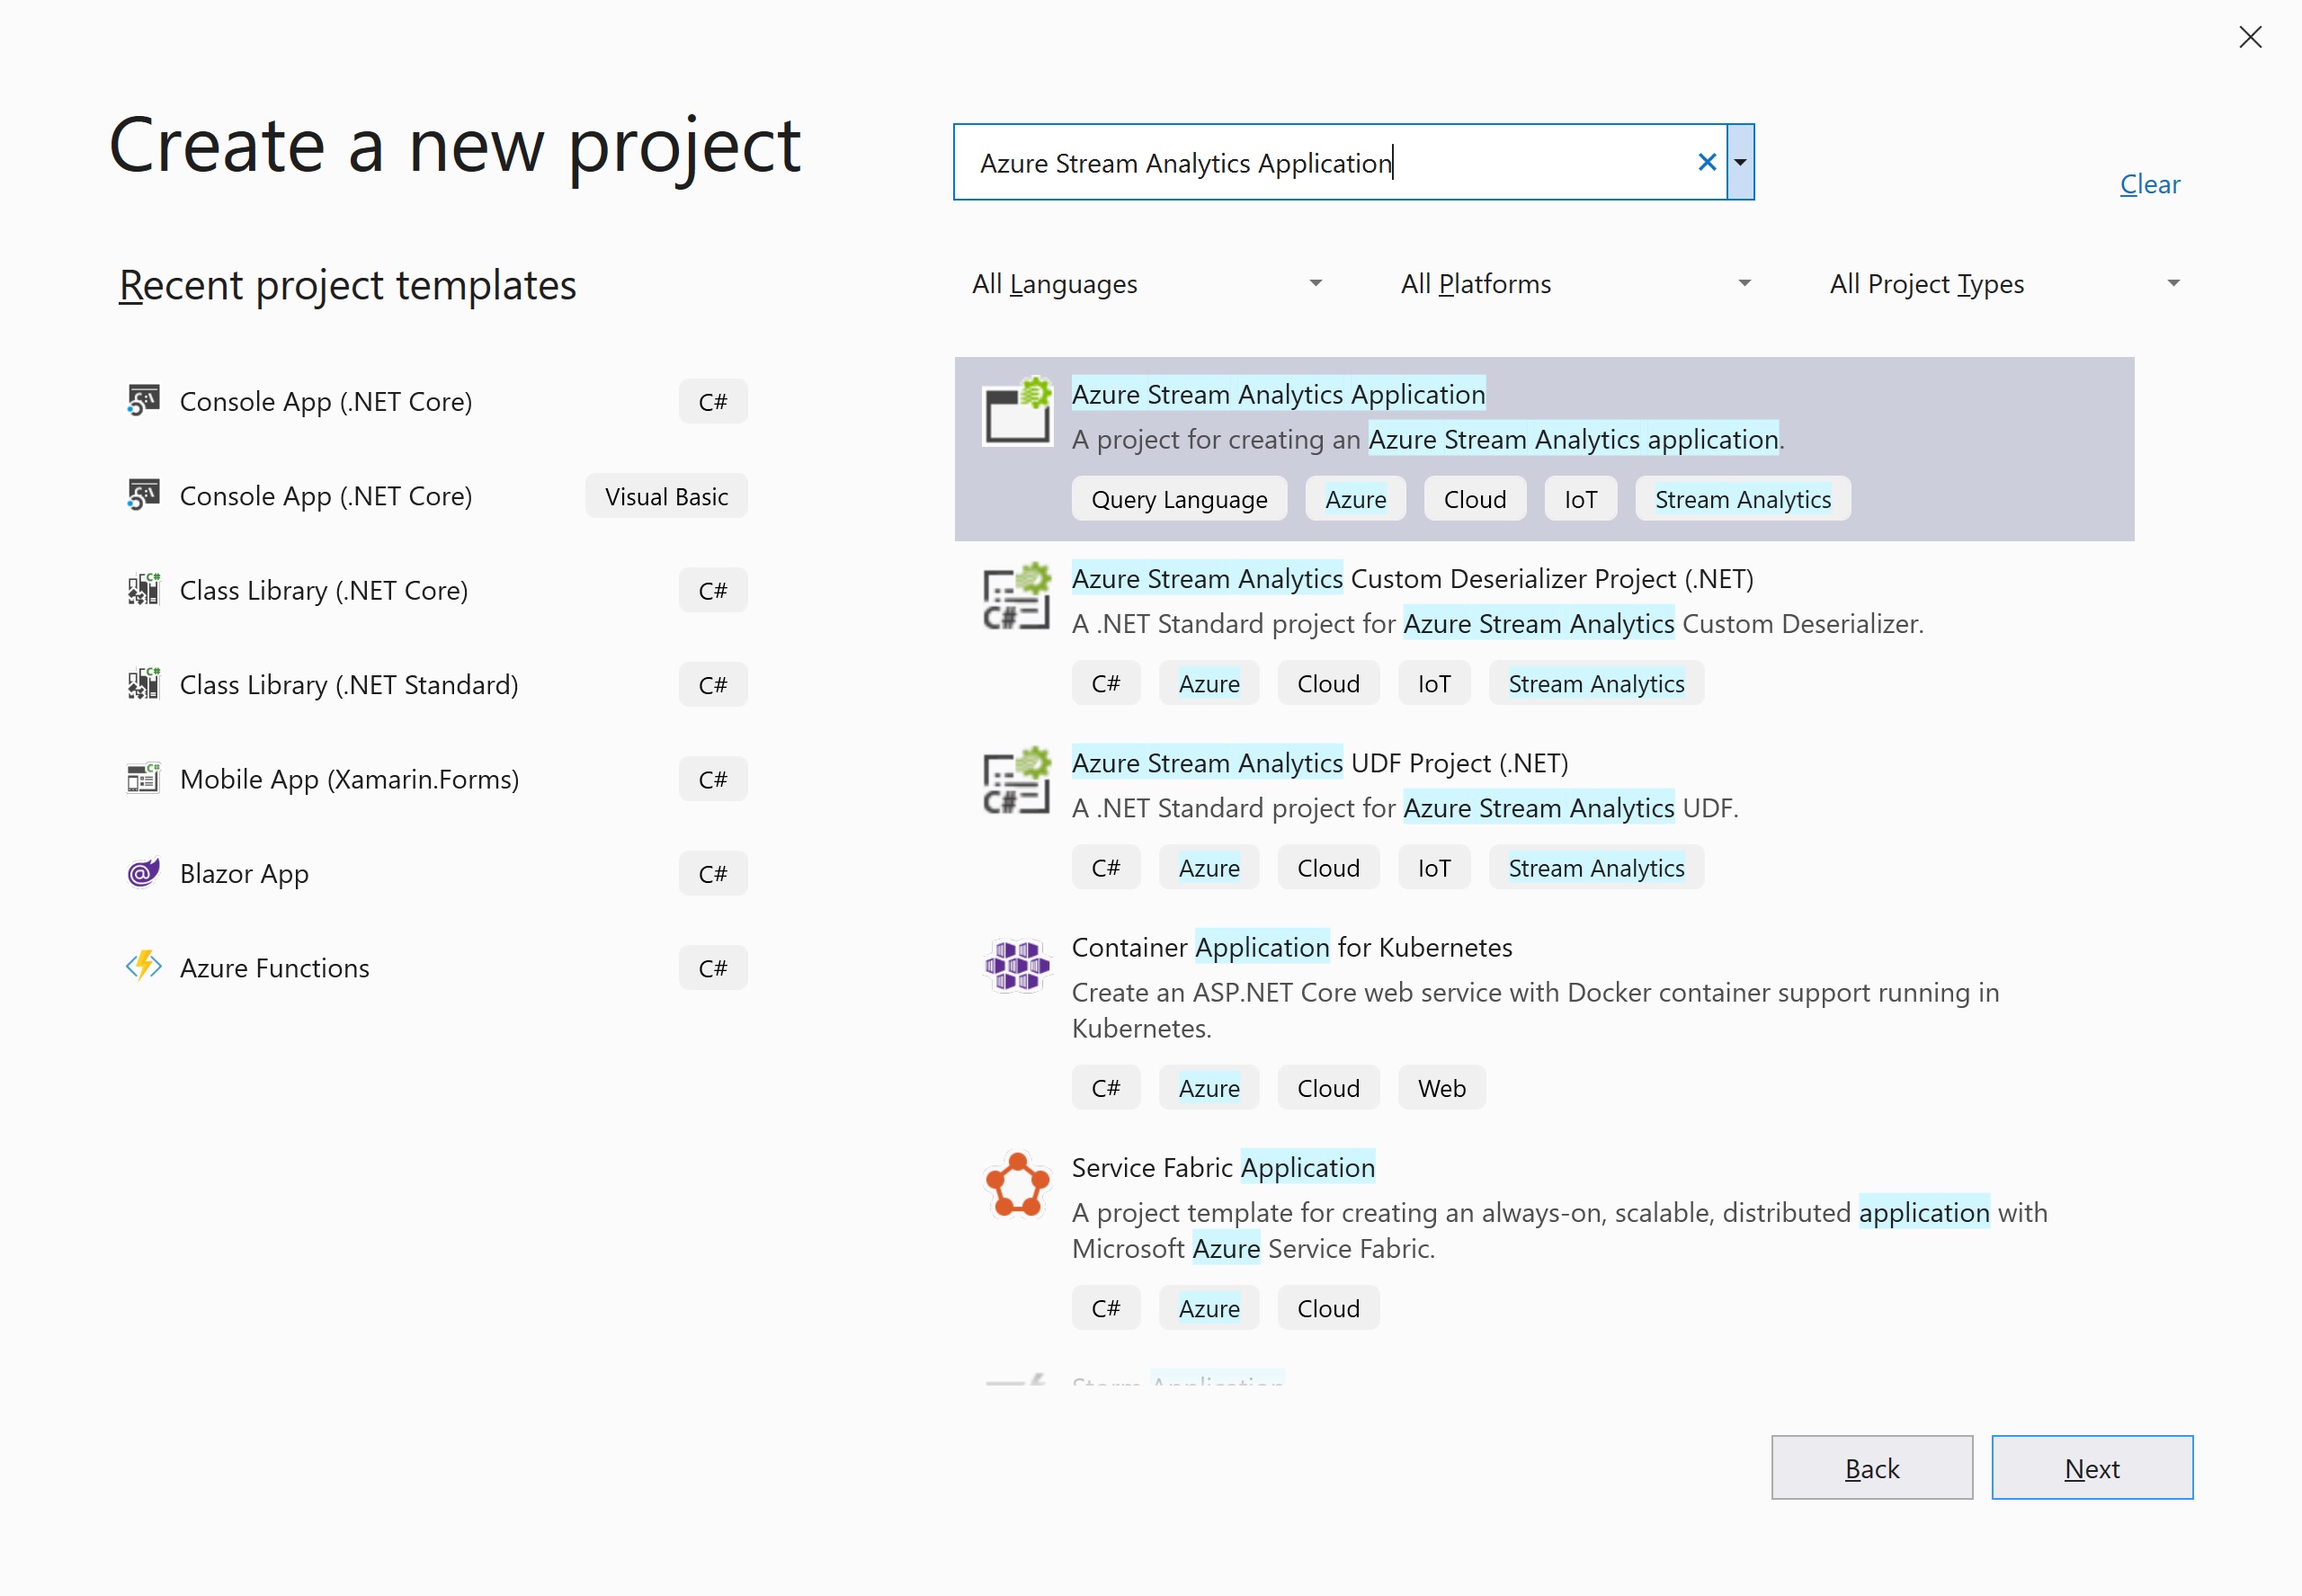
Visual Studio has fantastic support for Azure Stream Analytics, and if you download the Azure Data Lake and Stream Analytics VS extension, you’ll be well looked after. To get started, open up Visual Studio and select to create a new project of type Azure Stream Analytics Application.
The example that will be used throughout this post will be one of a real-time fraud detector that will examine incoming transactions to determine if they are fraudulent or not. The full source code can be found here.
For simplicity’s sake, we are going to assume we already have a trained ML.NET model (which you can find in the repo).
Setting up the Azure Stream Analytics query
The first thing we need to do is to define the continuous query. To get comfortable with Azure Stream Analytics, we’ll start by defining a query that reads everything from an input and dumps it to the output window in Visual Studio. The query will be as simple as:
SELECT *
INTO output
FROM input
The logical question that follows is how do we define an input, and what options do we have? Azure Stream Analytics in Visual Studio supports both cloud inputs from e.g. an Event Hub, or local inputs reading from a JSONor CSV file. For our purposes, we’ll be using a local JSON file, which you can find here. The content of the file looks as follows:
[
  {
    "Step": 1,
    "Type": "PAYMENT",
    "Amount": 4833.96,
    "NameOrig": "C1060042118",
    "OldBalanceOrg": 41005,
    "NewBalanceOrig": 36171.04,
    "NameDest": "M1964847681",
    "OldBalanceDest": 0,
    "NewBalanceDest": 0,
    "EventProcessedUtcTime": "2020-03-16T21:36:31.9415576Z",
    "PartitionId": 0,
    "EventEnqueuedUtcTime": "2020-03-16T21:33:28.0140000Z"
  }
]
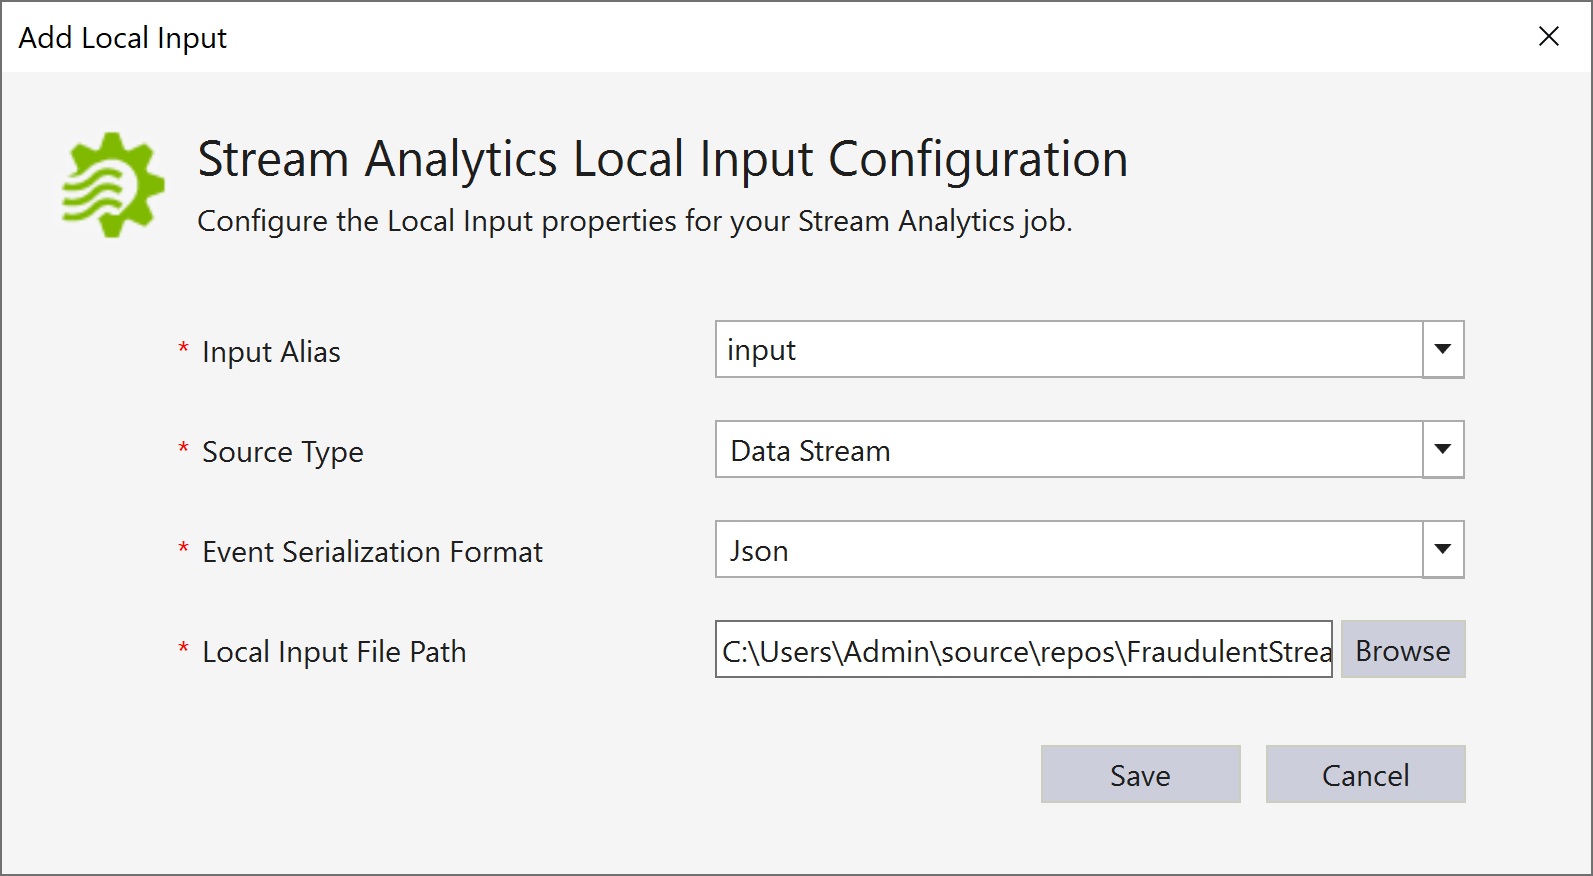
To define an input, right-click on the input folder and select to add a new item. In the list that appears, select to add a Local Input. Once added, double-click on the newly added file to define name, type and path to the local JSON file we will be using:
Nice work! If you now hit F5 or select to run the job locally, you’ll see Azure Stream Analytics read the content of the file and dump it into the output window in Visual Studio. That’s all well and good but not what we set out to achieve. What we now want to do is to capture the moving data stream and for each transaction use ML.NET to determine if the transaction is fraudulent or not. To our help we have UDFs. You’re currently able to write UDFs in either JavaScript or C#. They can be written as code-behind (I know, gives me nightmares too), or in a separate project that you reference. What we will do is create a separate project to host our ML.NET prediction engine.
Running ML.NET in a C# UFF
To ensure I focus on some gotchas in this post, I encourage everyone to take a look at my repo to see how a boilerplate C# project can be set up to:
- Define
ModelInput.csandModelOutput.cs - Load an ML.NET model into memory
- Create a
PreictionEngine<TInput, TOutput>
If you use the Model Builder to create your model, the tool will automatically create a project that is set up in this fashion.
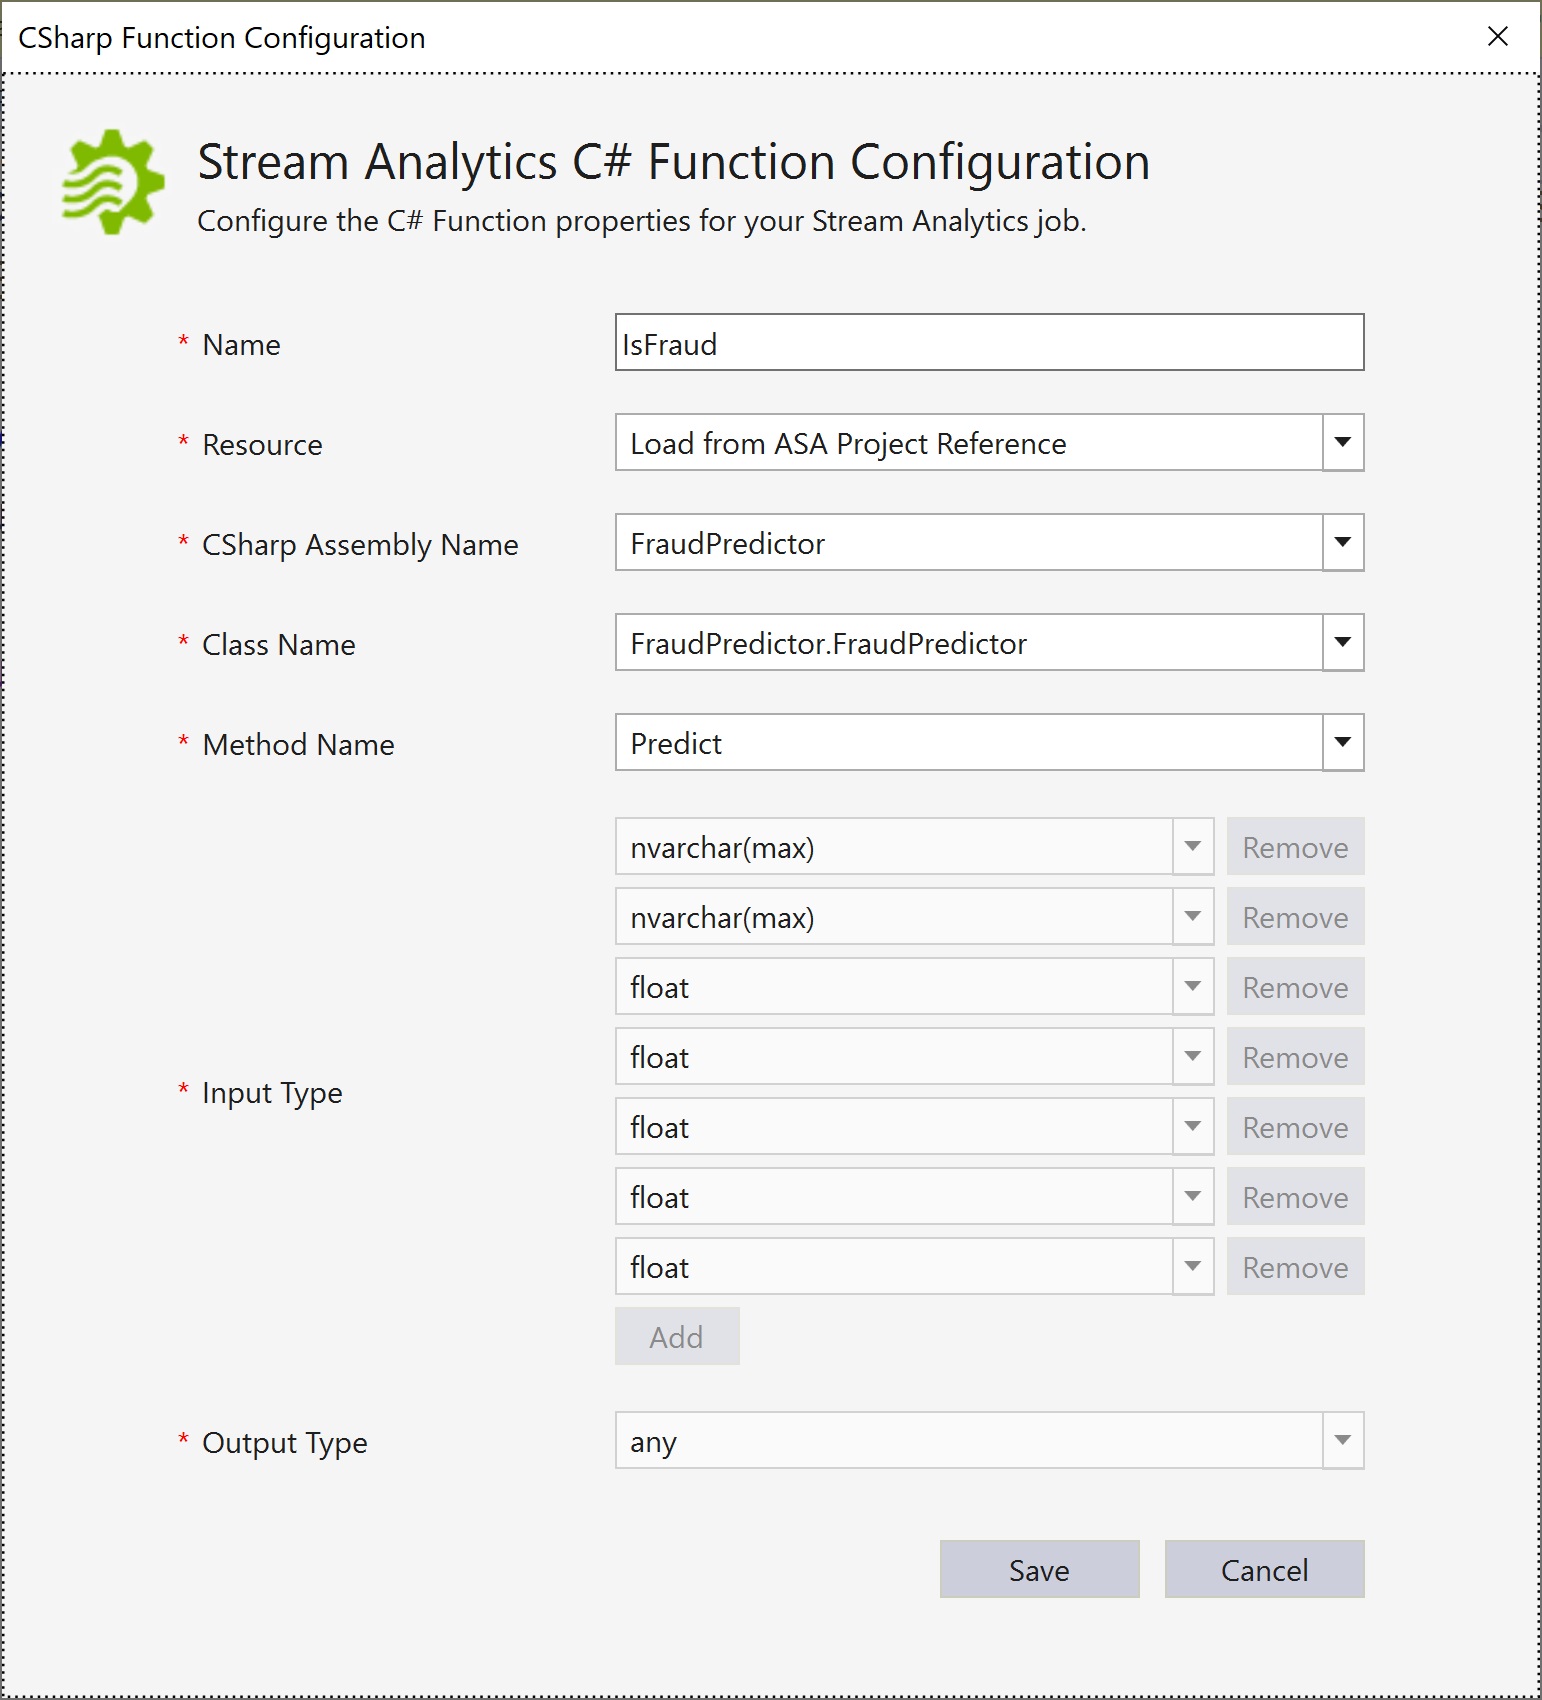
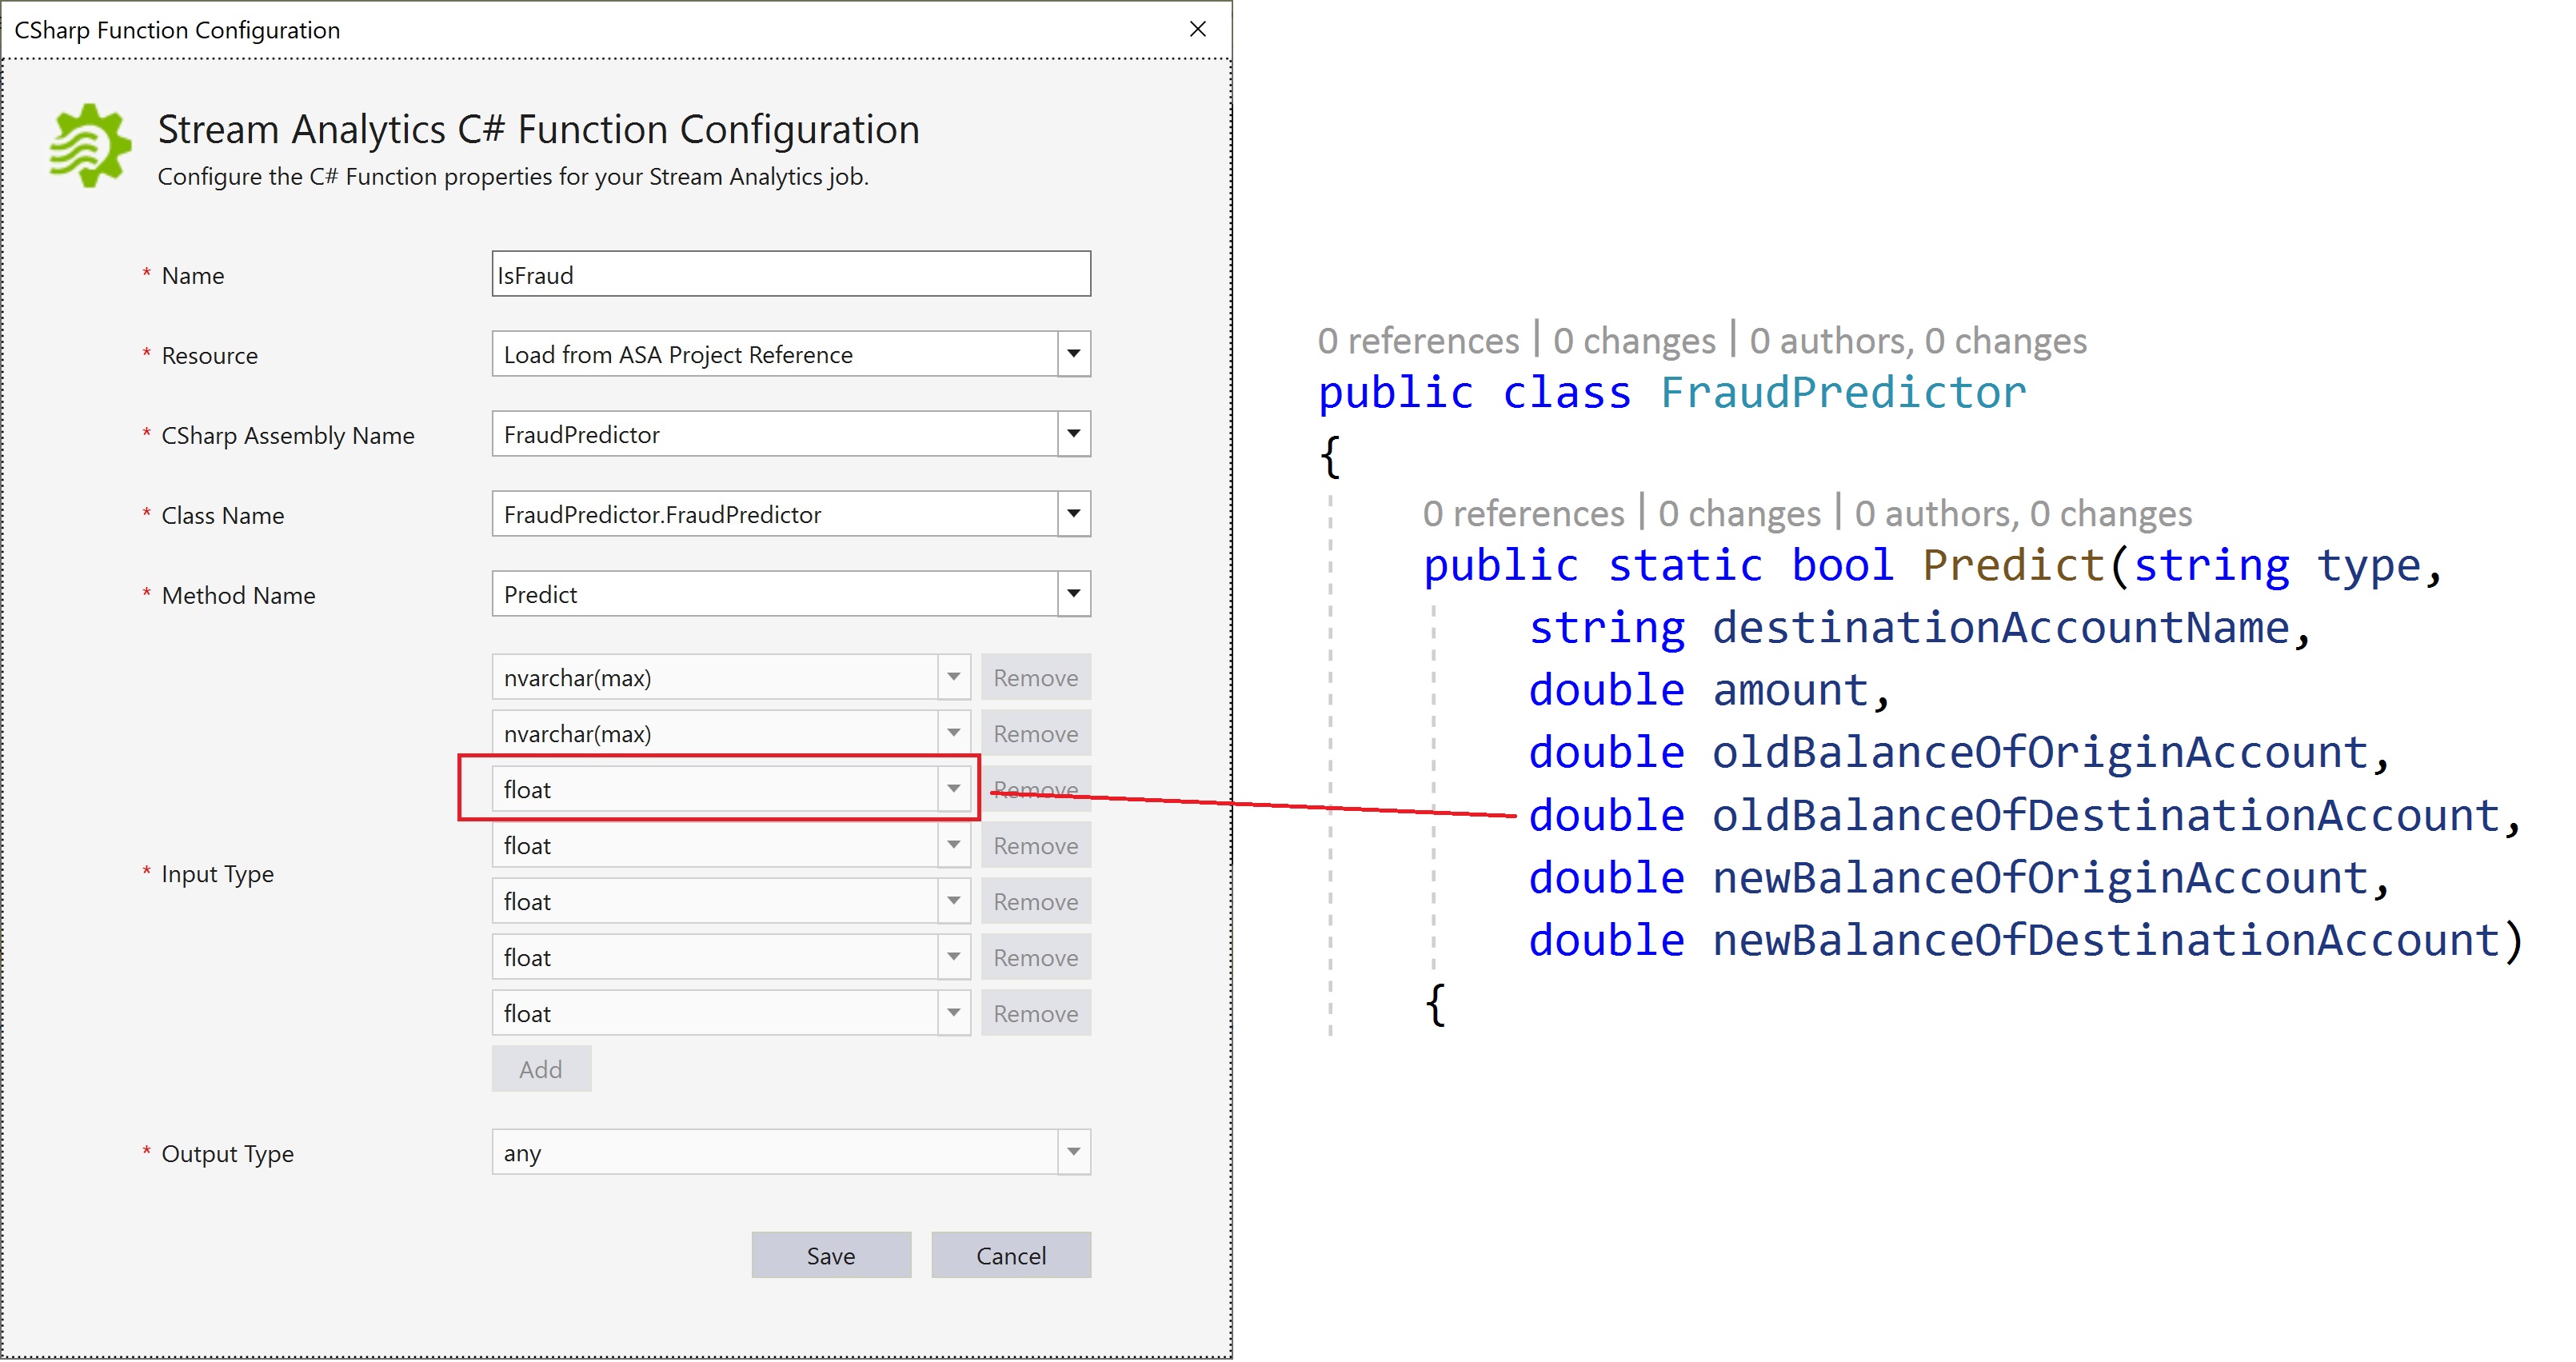
Once you have created your project, built the solution, and added a reference to the Azure Stream Analytics project, you can define a C# UDF that can be called inline from the continuous query. To set up a C# UDF, right click on the Functions folder and select to add a new item. In the list that appears, select a C# Function. If you then double-click on the function, you’ll get the opportunity to define the class library you’ve just added as well as the method you’ll like Azure Stream Analytics to call for real-time inference.
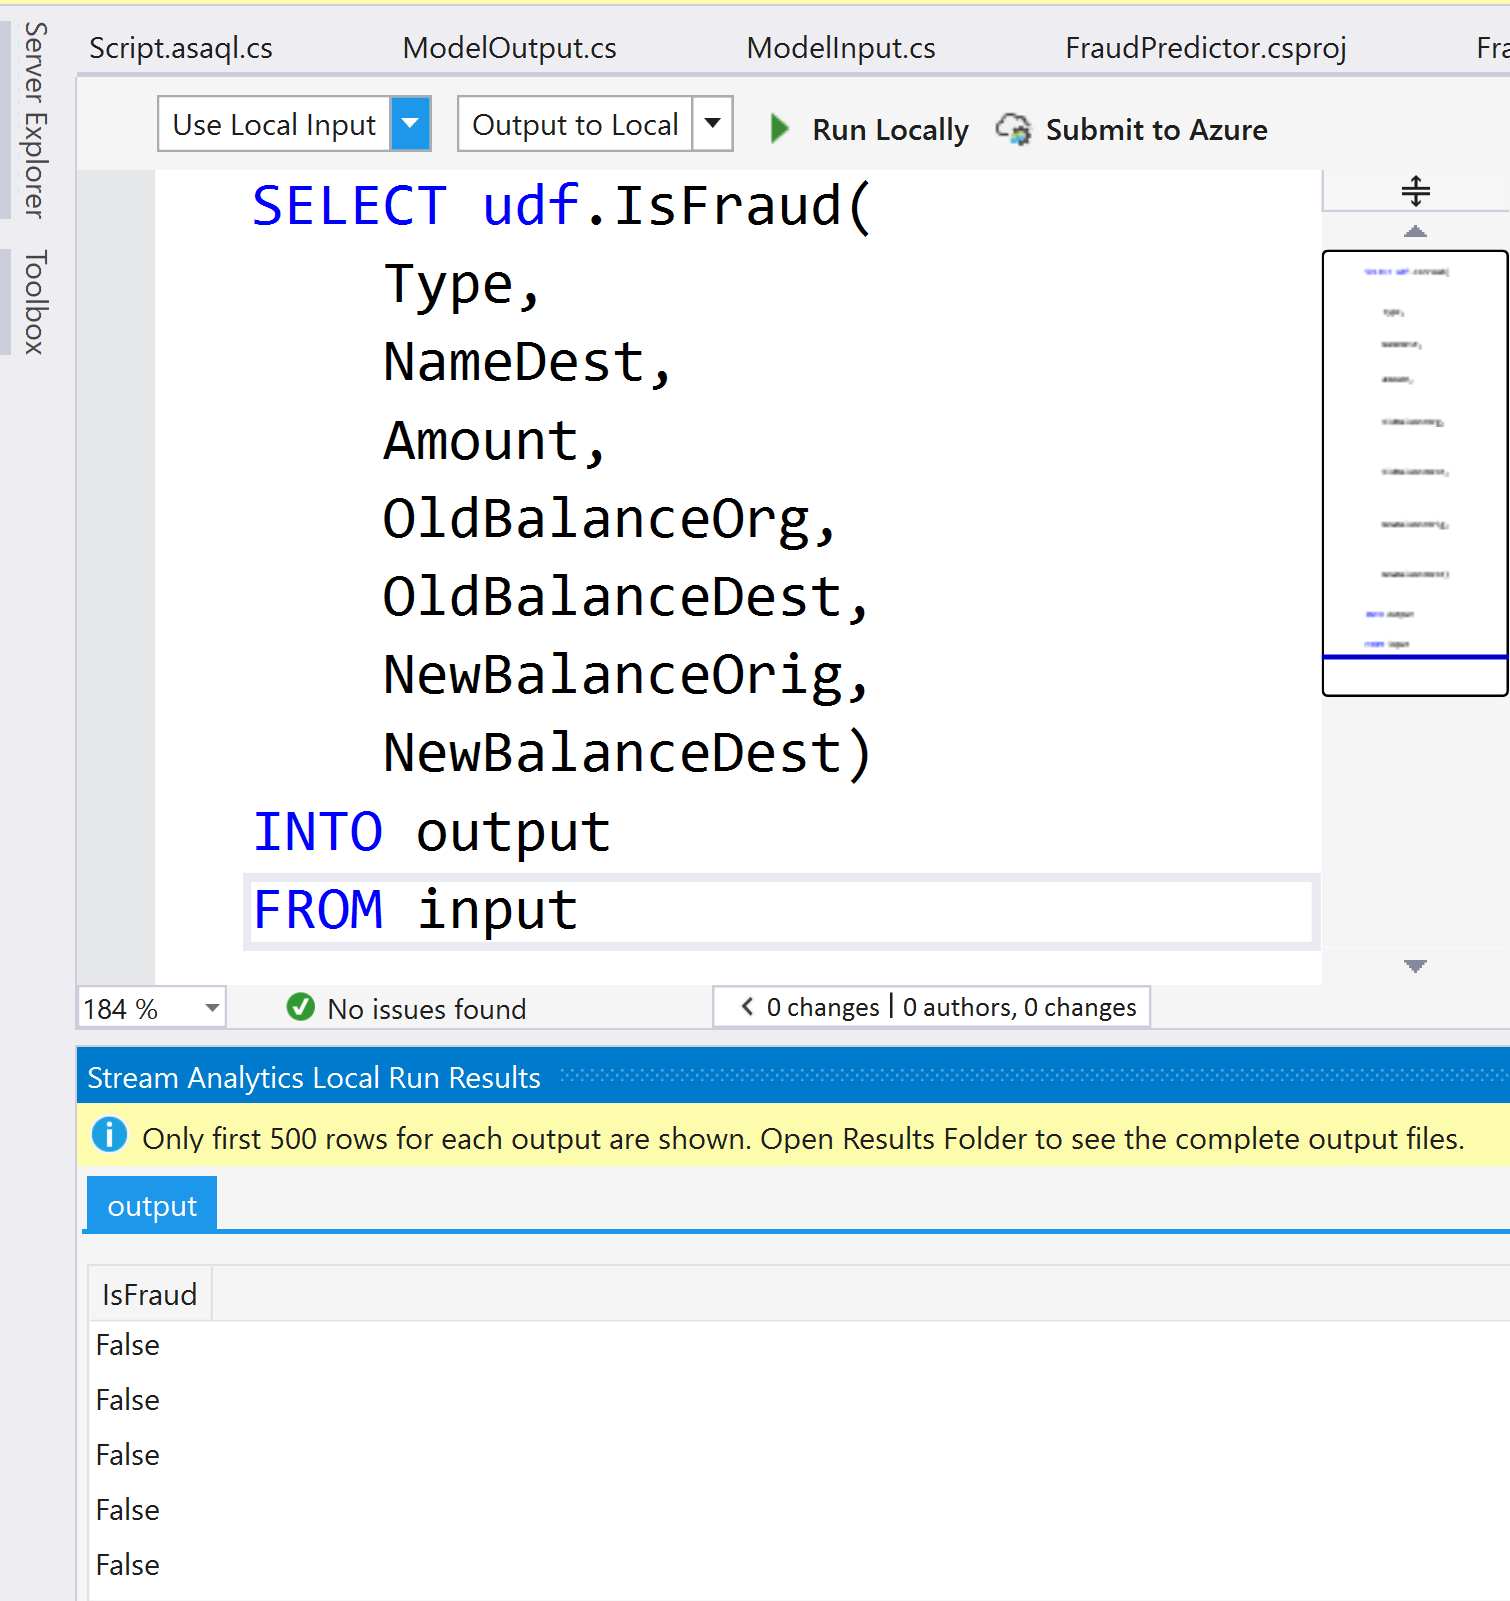
With the C# UDF defined, you can now update your query to call the function directly (please note udf.IsFraud)
SELECT udf.IsFraud(
    Type,
    NameDest,
    Amount,
    OldBalanceOrg,
    OldBalanceDest,
    NewBalanceOrig,
    NewBalanceDest)
INTO output
FROM input
Nice! If you now kick of the job by hitting F5 it will….fail. Wait, what? Well, there’re a couple of reasons for this, some which I want to highlight here to help others.
1. Floats should actually be doubles
The first issue you’ll run into is the casting of the numeric values. Although the C# UDF you defined earlier expects the numeric values to be of type float, you’ll actually have to define your input values as doubles in your Predict method, in order for things to work smoothly. This is not at all intuitive and I’ve reported it as a bug to the Azure Stream Analytics team.
2. Include assembly references or use the specific UDF project type
The second thing you may notice is that your dependencies to ML.NET may not be properly loaded. There are two solutions to this problem. The first one is to remove your NuGet package references to ML.NET and instead directly add the DLLs you depend on as assembly references. Your dependencies should now look as follows:
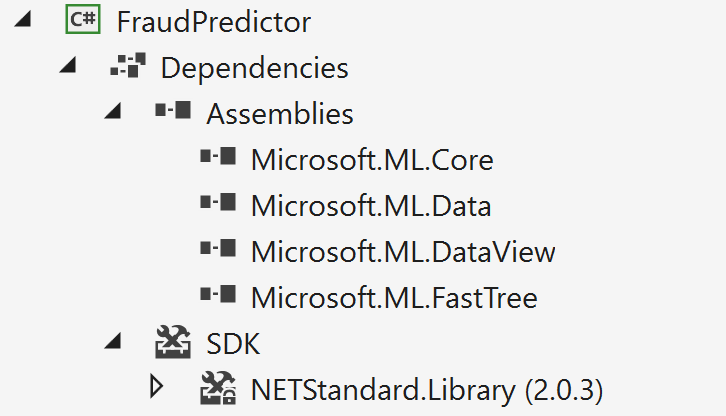
The second approach, which I would recommend, is to re-create the project using the Azure Stream Analytics UDF Project template. By using this project template, you’ll have support for NuGet packages as well.
With these changes complete, you should now be able to run your job locally and in the output window you’ll see real-time predictions on each incoming transaction. Congratulations!
Conclusion
In this post I’ve walked you through how to get started using Azure Stream Analytics together with ML.NET. I’m thrilled to see this addition to Azure Stream Analytic’s capabilities, and the steps taken to make ML.NET a first-class citizen in Azure. Happy coding!
